Saturday 26 October 2013

Elizabethan Portraiture vs Contemporary

The Ditchley Portrait


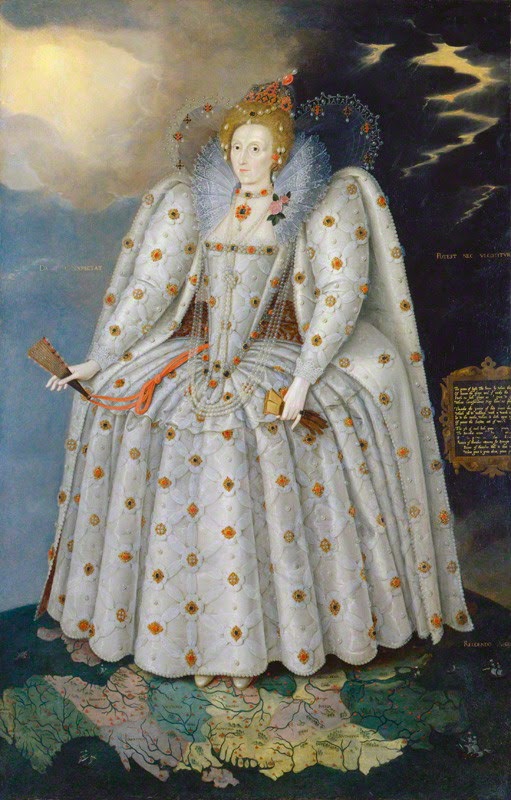
This is a portrait of Queen Elizabeth I, titled "The Ditchley Portrait". It was painted in 1592, by Marcus Gheeraerts the Younger. I find this image absolutely intriguing, for many reasons. Firstly, from a makeup and styling point of view, it is one of the portraits for me personally, that shows the alabaster skin, and red cheeks and lips perfectly. Her hair is up in a typical Elizabeth I way, and adorned with jewels. Her dress is elaborately decorated and she is layered in pearls right through from her hair, to her ruff and layered around her neck. Pearls were a symbol of purity and virginity, and this was the image Elizabeth wanted to reinforce time and time again in many of her portraits. She looks absolutely regal, and I love her white dress that again casts her in a pure, virginal light. Behind her, we see a clashing of dark and light, with Elizabeth positioned perfectly in the middle. I think that this shows her bringing the balance between good and evil, and although there is speculation that this portrait is a message of forgiveness to her champion Sir Henry Lee for becoming a "stranger lady's thrall", I believe that to her subjects, who didn't know the story behind the painting, it would appear that Elizabeth was promoting an image of her being the mediator between dark times and light. She is standing on a map of the world, symbolising her strength and power in leading England towards a strong future. I also notice she has her back towards the dark and is facing the light, possibly trying to show that the dark can be overcome, or that the darker times are behind them?


Anna Wintour is one of the most famous icons of fashion in the world. As the editor-in chief of American Vogue since 1988, she is one of the most influential figures in fashion history. The fact that she is best known for her over-sized sunglasses, bob hairstyle, and “chilly demeanour”, reminds me so much of Queen Elizabeth who had her trademark red hair, pale skin and untouchable image, yet related to so many people. She transformed Vogue magazine from a magazine aimed at wealthy, leisure loving women, to a magazine directed at the modern woman- fast paced,  independent executives who earned their own money and were not afraid to speak their opinions.  She has such an amazing understanding of what the industry needs, at the right time, and makes brilliant, fearless decisions constantly. She was the one who ended the ‘Supermodel era’, for example. She started favouring celebrities for the cover of her magazine over models. She was also the first to mix low-end fashion with high fashion in her magazine. It is this kind of thinking and decision making that makes me consider her a true Elizabethan. She is fearless, independent and knows what is right for her ‘people’, just like Queen Elizabeth did.

Sunday 20 October 2013

Technical Post: Shaping and contouring the face

To highlight and contour the face:

1. Apply your base as normal, but DO NOT powder. You are applying more grease based products, so there is no need to powder just yet.
2. Using a small rounded brush, choose either a foundation or concealer that is two shades lighter than the skin.
3. Feel the models face to get a good idea of where her bones in her face are structured. Start to apply your highlighting shade. Always go on with your highlighter shade first. It gives a cleaner application, and this applies to everything including eyeshadow.
4. Apply the highlighting colour along the cheekbone- make sure it is ON and ABOVE the bone. Make sure the highlighter is blended extremely well, you should not be able to see any streaks at all. Blend the colour right along the contour under the eye, down the centre of the nose, centre of the forehead, along the jawbone, on the cupids bow and anywhere else you want to bring light to the face- such as the brow bone or the inner corner of the eye.
5. To contour the face: choose a foundation or concealer that is 2 shades darker than the foundation.
6. Get your model to suck her cheeks in, and dot the colour underneath her cheekbone. Make sure to blend down, not up- you NEVER want the contour colour to go over the cheekbone. Blend the contour colour anywhere you want to shade the face, such as under the cheekbones, through the temples, and under the jaw. You can contour the sides of the nose to make the nose appear slimmer- make sure you stick to the sides and do not go onto the bridge of the nose. To make a long nose appear shorter, blend a tiny bit of contour colour onto the end of the nose. For a wide forehead, contour along the temples.
7. Add blusher. If you are using a powder blusher, make sure you powder the skin first at this stage. If you are using a cream blusher, put the blusher on first.
8. To add blusher, get your model to smile, and apply the blusher gently along the apples of the cheeks, and upwards towards the top of the ear. Make sure to blend the blusher extremely well, and avoid any harsh lines of streaks.
9. At this stage, if you wanted to add any extra powder blusher you can, or powder contour to emphasize the work you have done. You could also continue to bronze up the face at this stage of you wanted to warm up the skin.


Technical Post: Foundation Application

To apply the perfect base:

1. Make sure your model is gowned, and that all hair is pinned back from the face.
2. Using a spatula, scrape the colours you need from the palette and place on the back of your hand, and work from there-NEVER dip your brush into the foundation palette.
3. Mix your colours on the back of your hand if they require mixing, to get the right shades.
4. Place stripes of foundation along the jawline to get the right colour match- the shade that disappears is the right colour.
5. Using a buffing brush, start working the foundation into the skin, starting from the centre of the face and blending outwards, to avoid the product pooling in the centre of the face.
6. Use large circular motions to buff the foundation right into the skin, so that it looks like a second layer of skin. Make sure you buff the foundation right over the ears, and get your model to lift up her head and blend the foundation right down the neck, so it is all one colour. Stretch the neck to avoid it creasing. Make sure not to miss any areas such as around the nostrils, the creases of the mouth and the hairline.
7. Using a flat foundation brush, buff the foundation around the eye, and using backwards and forwards motions, get the foundation as near to the eye as possible. Then, using a powder puff, hold the corner of the eye up, and use backwards and forwards motions to blend the foundation right into the creases of the eye. Do the same with the eye open and blend under the eye.
8. Using a round concealer brush, start to apply the concealer. Never go more than 2 shades lighter with concealer. Blend it with the foundation on the back of your hand to ensure the colour blends well on the face,
7. Start in the inner corner of the eye and blend towards the outer corner and right up to the lower lash line. Blend concealer right down to the socket line, but no lower. Blend right around the corner of the nose, and corners of the mouth, and then conceal any other areas of the face that need concealing, such as red patches or blemishes.
8. To powder the skin, put some loose, translucent powder onto the back of your hand. Dip your powder puff into it and roll the powder gently over the foundation. By rolling it and patting it, rather than brushing it, you do not move the foundation underneath. and it sets the makeup a lot better. Make sure to powder the eyelids and underneath the eye really well, as this is where the makeup is most likely to crease.
9. If you need to, take your round concealer brush and work the powder along the eyelid, if there is any creasing.


Friday 18 October 2013

Elizabethan Beauty


Back in the Elizabethan times, image was absolutely everything. There was so much thought that went into how they presented themselves as this denoted where you stood in terms of wealth, power and aristocracy. The simplest example of this was their obsession with pale skin. This was for both men and women; and it was for the simple reason that if you were of a lower class, you were poor and therefore had to work outside to earn your living, and so your skin would be more tanned from the sun. If you were of the upper class, you had pale, alabaster skin, showing that you did not have to work to live. Pale skin, to the Elizabethans, was a mark of good breeding and wealth. This pale skinned look was favoured by Queen Elizabeth I, and therefore all upper class men and women took to lightening their skin, as she did.

There were several methods of lightening the skin, the most common being to mix ceruse (a highly toxic white lead pigment) with vinegar and apply it to the face, neck and hands. As your skin is an organ, the ceruse would be absorbed into the body and would cause lead poisioning. This would cause such problems as hair loss, extreme skin damage and eroded teeth- which I believe to have owed to the later Elizabethan look. As the Queens hairline receeded, high foreheads became more popular, resulting in women of the court to actually pluck their hairline to achieve the desired look. As the Queens skin became more eroded, she would layer the toxic foundation on even thicker. In all portraits of the Queen, her mouth is clamped shut to hide her decayed teeth.

‘white lead, wherewith women use to paint themselves was, without doubt, brought in use by the divell, the capitall enemie of nature, therwith to transforme humane creatures, of fear, making them ugly, enormious and abominable… a man might easily cut off a curd or cheese-cake from either of their cheeks’. -Thomas Tuke A Treatise against Painting and Tincturing of Men and Women 1616

The above quote I believe to be so powerful in creating a perfect image of what it was really like seeing Elizabethan women. We can only speculate about how horrific the layers of poisonous makeup must have made them look, but to see them described as "ugly, enormious and abominable" by someone that was actually there to witness, emphasizes just how over the top it was. 


At the age of 28, Elizabeth contracted chickenpox. This left her skin badly scarred, and for someone who's image was so important, we can imagine she was devastated by this. She fought hard to maintain her image however, and extra foundation would be layered onto her skin to completely cover it up. 

As mentioned before, the lead foundation would erode the skin, and it would also give it a grey, shrivelled appearance. To smooth out their shrivelled skin, they would then apply a glaze on top of the foundation, make from egg white. This was then finished off with a paint called fucus, which gave their cheeks and lips the red colour that was so popular. Madder, cochineal (a type of beetle) and ochre-based compounds were used as cheek colours, although vermillion (mercuric sulfide) was the most popular. 

Below are some Elizabethan beauty recipes:

To make you beautiful:
Take iris roots and grind and make juice and put in a vial and leave it to settle. Then take the water from the top of this mixture, put it in fresh water and with this mixture wash the face, and it will be beautiful and have a notable color


To cure redness of the face: 
Take white lead [ceruse], rose water and violet oil and mix together and anoint the face.


To remove marks from the face:
Take iris [Iris florentina] roots and boil them in water until it is reduced by half, then purify and with this water wash the face and you will be free of blemishes


To make the hands and face white:
Take leaves and roots of nettle and boil them in water and with this water wash your hands and face and they will become white and soft.


The price women paid for beauty at the time seems extreme, but at a time when your image was everything, the struggle to be "beautiful" must have seemed like a small price to pay if it meant that you were accepted in the court.


Wednesday 16 October 2013

Egg White Experiment

Back in the Elizabethan times, egg whites were used to glaze the skin to hide the grey, shrivelled appearance of the skin caused by the toxic makeup products they used. In Lara's lesson, we experimented with putting egg white on each others faces to see what it felt like and how it make the skin look.

To apply the egg white to the face:

1. Prep the skin- cleanse, tone and moisturise
2. Apply a layer of foundation that matches the skin.


3. Whisk up the egg white and using a foundation brush, apply to the skin using long, even strokes. Leave to dry for a couple of minutes and apply a second layer.
4. Mix remaining egg white with white tempura powder until you have a runny paste, and apply in the same way, on top of the egg white.


This was a very interesting experiment, as you could see why they would have thought the skin looked better, as it did give the skin a sort of sheen all over, which must have been a huge difference to their dull, dry skin. However, once the egg white dried on the face it became very difficult to move your face and the glaze started to crack if you were to smile for example. It did give a good insight to what it may have been like back in the Elizabethan times, and I think it owed to the lack of expression you see in a lot of Elizabethan portraiture.

Sunday 13 October 2013

Cleanse, Tone, Moisturise!

The basis of any good makeup look is good skincare. Skin needs to be thoroughly prepped in order to achieve a flawless look. Makeup needs to be completely removed using a good cleanser, then the skin needs to be toned to further remove any traces of makeup, and to tighten the pores. Moisturising the skin hydrates the skin, and helps improve the elasticity of the skin. It also helps to create a smooth. Soft base for any product to follow. There are hundreds of different products out there for each of these, some more general, and others targeted at specific problems such as acne, dry skin, sensitive skin etc.

As a makeup artist, you should always use products designed for sensitive skin, for the simple reason that it just covers all your bases. Sometimes you may come across people (particularly celebrities or people that spend a lot of time in front of cameras), that will bring in their own products for you to use, as they know what works for their skin. In your personal makeup kit, however it is always best to carry products for sensitive skin.

I have done some research on different cleansers, toners and moisturisers on the market, that I feel work really well. I will put several different ones of varying price ranges, although more expensive products are not necessarily always best, and sometimes it is just a case of trial and error until you find the perfect product.

Cleansers

Micellar Water
Micellar Water is quite a recent beauty innovation. It has been around for years, but has recently become extremely popular in the beauty world. These cleansers feel like a toner, but remove makeup and dirt, cleansing the skin beautifully, leaving skin feeling hydrated and nourished, rather than stripped like others do. 


1.       Eau Micellaire Douceur by Lancôme £22.50 www.boots.com


2. Sensibo H20 by Bioderma £9.99 www.escentual.com


3. Skin Perfection 3 in 1 Micellar Water by L'Oreal Paris £4.99 www.boots.com


Cream Cleansers

Cream cleansers are fantastic for people with dry skin, mature skin or people that prefer a richer, more nourishing cleanse.

1.       Take the Day Off Cleansing Milk by Clinique £19.00 www.boots.com


2.       Physiological Cleansing Milk by La Roche-Posay £11.00 www.boots.com


3.       Pure and Natural Cleansing Lotion by Nivea Visage £2.30 www.boots.com


Toners

Toner is essential for many reasons. It helps to residue left from cleansing, tightens pores, restore the skins pH balance after cleansing, and re-hydrate the skin.

1.       Instant Boost Skin Tonic by Liz Earle £13.25 www.lizearle.com


2.       Effaclar Clarifying Lotion by La Roche-Posay £11.00 www.boots.com


3.       Daily Essentials Refreshing Toner £3.59 www.boots.com


Moisturisers

Moisturising your skin is extremely important! It helps to restore the moisture balance in your skin after cleansing and toning, and helps create a protective barrier over your skin, against any makeup products you apply afterwards.

1.       Hydrazen Neurocalm by Lancôme £39.00 www.boots.com


2.       Aqualie Thermal by Vichy £16.00 www.boots.com


3.       Daily Essentials Light Moisturising Cream by Nivea £4.19 www.boots.com


Technical Post: How to Cleanse, Tone and Moisturise

Well prepared skin, is the key to any good makeup look. Therefore skincare is not only important, it is essential. 

Skin must be thoroughly cleansed, and any previous makeup properly removed, otherwise the makeup you put on will never look its best. In the same way that you would not use dirty makeup brushes to apply makeup, you would never layer new makeup on dirty skin. 

Items needed:
-Cleanser (Always choose one for sensitive skin, and one that removes eye makeup as well)
-Cotton Pads

To cleanse the face:

- Make sure model/client is comfortable in the chair and has a gown over them
- Complete consultation notes to determine skin type, as well as any allergies
- Ensure all hair is pinned/tied back so that the face is clear
- Start by applying cleanser to cotton pads and using upward strokes, apply the cleanser to the face and neck. 
-Using fluid strokes, cleanse up the neck, across the jaw, up the cheeks, over the top lip, down the nose, across the forehead, across each eyelid, and through the brows.
-Place a cotton pad under the eye and get model to close their eyes. Take a cotton bud dipped in cleanser and using backwards and forwards motions, run cotton bud across lashes and lashline to remove any traces of mascara. Get your model to open their eyes and look upwards and run cotton bud across lower lashline in the same motion until all eye makeup is removed.

To tone the face:

-Apply toner to cotton pads
-Using the same motions as the cleansing, tone the face, avoiding the eye area

To moisturise the face:

-Apply a pea-sized amount of moisturiser to the palm of your hands and warm between fingertips so it is not too cold on your models face.
-Massage onto face and neck, again using the same upward strokes as cleansing and toning

*At this stage you can apply some form of lip balm to prep the lips, so that it has time to absorb before any lipstick is applied.


Elsa Schiaparelli's 'Lobster Dress'


The image of Wallis Simpson posing in the Lobster dress is interesting because at first it strikes me as rebelling against the conventional. At a first impression, the dress looks like a wedding dress, but then the eye is immediately drawn towards the image of the lobster that contrasts starkly against the white of the dress.
The styling of the dress conveys a sense of modesty, and graceful femininity. Her shoulders are covered with a delicate shawl, and I believe it is meant to create a sense of grace and elegance. The background is beautiful- out in nature, with soft lighting around her, creating an almost angelic impression.
The image, although it is obviously posed for, does not have that feel to it. It is not clearly taken in a studio with harsh lighting, but instead is outdoors and gives the feel of ‘looking in’. It is depicted from a distance, and she appears to be unaware of the camera, or does not pay it any attention. Although the background is quite busy, it works extremely well. The dress is striking enough to not let the background take over, and in fact the trees and the lighting add to the whole image. It creates a gentle, romantic atmosphere. The image is telling a romantic story. It is a very soft, feminine picture. The bouquets she is holding, are a hint towards her upcoming marriage, and again help with the image of the innocent bride.

 The image was taken shortly before Wallis Simpson’s marriage to Edward III. At the time this photograph was taken, she did not have the best reputation, having been divorced twice before. I believe the photographer was trying to cast her in a much more angelic, flattering light. It is interesting however, that the dress with the lobster was chosen, as lobsters were known to have a sexual connotation behind them, as lobster is known as an aphrodisiac. This does slightly contradict the overall feel of the photograph, however Schiaparelli said “Women shouldn’t be afraid of being conspicuous, but should dare to be different”, so perhaps this was her thinking behind the dress, as the lobster against the white dress lends it quite a rebellious feel.


The image was aimed at the general public, to cast her in a more favourable light, as well as those who criticised her for marrying into the Royal Family, having been divorced twice.  

Saturday 12 October 2013

Technical Post: Skin and Hair Diseases

As a Makeup Artist in the industry, there are certain skin and hair conditions to be aware of, so you know when you can absolutely not work on someone with these, and when you can. I have listed the most common ones below.


Contagious Skin and Hair Diseases

               Impetigo
Impetigo is a highly contagious bacterial skin infection that causes red sores that often break and leak pus or fluid. You should not work on someone who has Impetigo, as it is so highly contagious.

Ringworm
Ringworm is a common and highly infectious skin infection that causes a red ring-like rash on the skin. Ringworm is passed between people through direct skin contact and sharing objects such as towels and brushes, therefore you should not work on someone who has ringworm.

1          
       Conjunctivitis
Conjunctivitis is an infection that causes redness or inflammation of the eye. All types of conjunctivitis, apart from Allergic Conjunctivitis are contagious, and you should not work on anyone with conjunctivitis.


 Scabies
Scabies is a contagious skin condition caused by tiny mites that burrow under the skin. It presents itself in the form of a rash where the mites have burrowed. Scabies can be passed through sharing towels, brushes, clothing etc. so you should never work on someone with Scabies.

Shingles
Shingles is an infection of the nerve and the skin around it. It is caused by the herpes-varicella zoster virus, which also causes chickenpox. Shingles causes a painful rash, which develops into painful blisters.

Non-Contagious Skin and Hair diseases

     Herpes Simplex
Presented in the form of cold sores, which are small blisters that form around the mouth or on the lips.


Psoriasis
Psoriasis is a skin condition that causes red, flaky, crusty patches of skin covered with silvery scales. This condition is not contagious, but extra care must be taken when working on someone with Psoriasis.

    Acne
Acne is a common skin condition that affects most people at some point. It causes spots to develop on the skin, usually on the face, back and chest. The spots can range from blackheads and whiteheads which are often mild, to inflamed pus-filled pustules and cysts, which can be severe and long lasting and can lead to scarring. Although you can work on someone with Acne, precautions should be taken.

Queen Elizabeth I 'The Phoenix Portrait'


In this portrait of Queen Elizabeth I, we see her against a rich red backdrop. I believe the colour of the background is very deliberate, and is gives the picture a much more regal, authoritative feel, than if it was set against a more muted colour.
Queen Elizabeth is wearing a beautifully elaborate gown, again lending to the regal, wealthy image I believe she is trying to portray. The shape of the dress- narrow sleeves with broad tops, tight-fitted, front-opening bodices with very full overskirts and low, curved necklines, was not only extremely fashionable at the time, but also gives her quite a powerful stature.
The portrait is named “The Phoenix Portrait” because of the Phoenix jewel at her breast. The Phoenix itself is a mythical bird that symbolises rebirth and chasity- both of these quite important to Queen Elizabeth, because by the time this portrait was painted, she had transformed herself into “The Virgin Queen”. I believe by having something so symbolical in her portrait, she was sending a message of reassurance to her people, and a firm message of knowing who she was, and reiterating her status to her peers.

One interesting note about the gown, is that underneath all the embroidery and embellishments, the fabric is blue. Blue was typically a colour worn by the lower classes at the time. This makes me think that she was trying to send a message to her people, or perhaps trying to make herself seem easier to relate to.

Wednesday 9 October 2013

Introduction


This project is called "The New Elizabethans". In this project I will be exploring Elizabethan makeup, from the very beginning to today, looking at how things were done then compared to now. I will be researching Queen Elizabeth I herself, and looking at why she chose the makeup she did. I will also be looking at the way makeup transforms you, as it transformed Elizabeth herself. All of my research will be documented here on my blog, and I look forward to learning about, and exploring the Elizabethan era, as it was such a critical era in the history of Makeup, and I think it will be so fascinating. All of this research will lead to a final project, which is to create a contemporary Elizabethan Makeup and Hair look.